

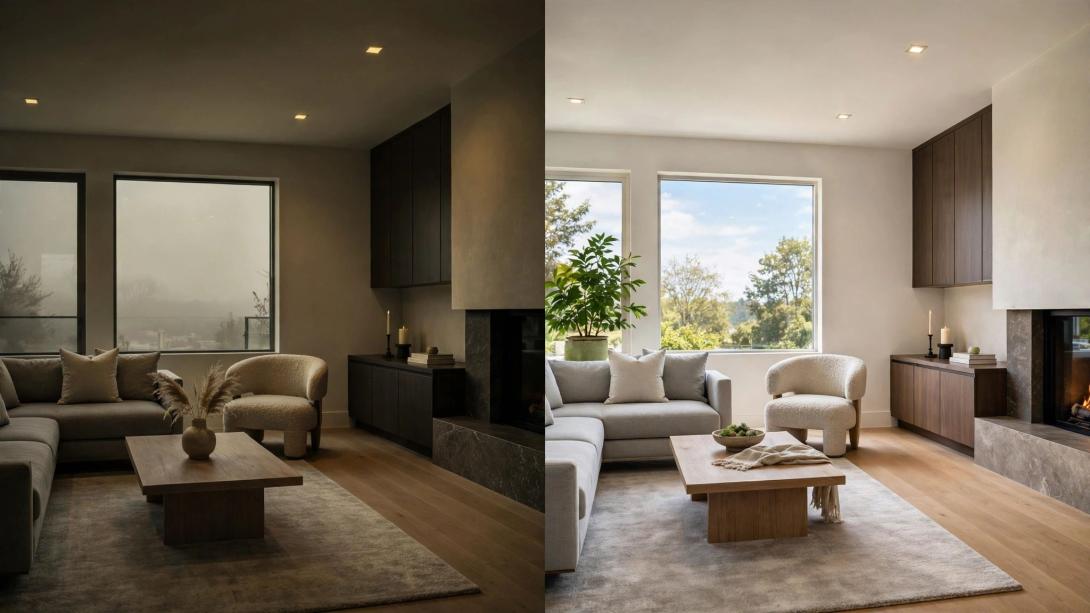
Let’s be honest. We all take hundreds of photos, but only a handful really stop someone from scrolling. That difference is rarely the camera. It’s what happens after the click. That’s image enhancement.
If you’ve ever wondered why a property looks dull in your camera roll but magazine-worthy on a portal like Zillow, Realtor, or Airbnb, the answer is not a $5000 lens. It’s smart, intentional enhancement. And in 2026, where every buyer decides in 7 seconds whether to swipe or stay, it’s no longer optional.
This guide breaks down everything about image enhancement — from basics to advanced real estate techniques — in plain human language. No jargon, no fluff.
What Exactly is Image Enhancement?
At its core, image enhancement is the process of improving the visual quality of a photograph so it communicates better. It’s not about faking reality. It’s about bringing the photo closer to what your eye actually saw on location.
Our eyes are incredibly smart. They automatically adjust for shadows, bright windows, and dull colors. Cameras aren’t. A camera will make a beautiful living room look yellowish, dark, or flat. Enhancement corrects that.
Think of a RAW photo as raw dough. Enhancement is baking it. You adjust the ingredients — light, color, sharpness, perspective — until it’s presentable, appetizing, and true to the original.
For a regular portrait, that might mean softening skin and brightening eyes. For product photography, it’s cleaning up reflections. For real estate, which is where enhancement truly makes or breaks a deal, it’s a completely different game.
Real estate photo enhancement for quick home sale is not just about making a photo pretty. It’s about making a buyer feel like they are already home.
Why You Can’t Skip Image Enhancement in 2026
We live in a visual-first economy. A study by Redfin last year noted that homes with professionally enhanced photos get 61% more online views and sell up to 32% faster than those with unedited photos. That’s not a small margin.
Here’s why it matters so much now:
1. First Impressions Are Digital. 97% of home buyers start their search online. They never visit a property if the first 5 photos don’t hook them. A dark hallway or a blown-out window view is enough to lose them.
2. Cameras Lie About Light. Interior spaces have mixed lighting — warm bulbs inside, cool daylight outside. Your camera picks one and ruins the other. Without professional color correction for property photos, white walls look orange and hardwood floors look grey.
3. Competition is Brutal. On any MLS listing, your property is sitting next to 10 others. If theirs is bright, sharp, and has a blue sky, and yours has a dull grey sky and tilted walls, you’ve already lost.
4. Trust and Perceived Value. A sharp, clean, well-lit image subconsciously tells a buyer that the home is well-maintained. A blurry, dark image says the opposite, even if the home is pristine.
This is why top photographers don’t deliver straight-out-of-camera images. They deliver enhanced images.
Core Image Enhancement Techniques That Every Photo Needs
Let’s get into the actual work. These are the foundational pillars. Whether you are editing a selfie or a $2M villa, you will use these.
1. Color Correction and White Balance
This is ground zero. Every light source has a color temperature. If white balance is off, your entire image feels wrong. Correcting it makes whites truly white. For real estate, this is critical. You want that soft beige sofa to look beige, not mustard yellow. Accurate color builds trust.
2. Brightness, Exposure and Contrast Balancing
A common problem: the room is dark but the window view is too bright. You can’t fix this with one slider. Pros use exposure blending and HDR blending for real estate images. They merge multiple exposures — one for the room, one for the window — to create a single, naturally bright photo where you can see both the interior and the view outside.
3. Perspective Correction and Vertical Straightening
Have you ever seen photos where walls look like they are leaning inward? That’s lens distortion. In real estate, vertical lines must be vertical. If walls tilt, the room feels small and unprofessional. Perspective correction for real estate photography fixes this instantly and makes spaces feel larger and more honest.
4. Sharpening and Noise Reduction
Low-light interiors often create grain or noise. Enhancement carefully removes that grain without making the image look plastic. Then, subtle sharpening is added to make edges crisp — especially important for high resolution image enhancement for real estate where buyers zoom in on details.
5. Lens Distortion and Chromatic Aberration Removal
Cheap wide-angle lenses used for property shoots create bulging and color fringing around window frames. Good enhancement removes it.
6. Sky Replacement and Enhancement
A grey, overcast sky can kill an exterior shot. Professional sky replacement for property photos swaps a dull sky with a natural blue sky with soft clouds. When done right, it looks 100% real and adds life to the entire photo. It’s one of the highest ROI edits.
7. Object Removal and Cleanup
Power cords, trash bins, toilet seats left up, your reflection in a mirror, cars in the driveway. Small distractions ruin big photos. Clean object removal for real estate images keeps the focus on the property, not the clutter.
These seven techniques alone can take a photo from 4/10 to 9/10.
Image Enhancement for Real Estate: Where Every Pixel Sells
Real estate photography is not artistic photography. Its job is to sell. That means the enhancement rules are different.
A wedding photographer can be moody and dark. A real estate photographer cannot. The image must be bright, airy, welcoming, and spacious, while still looking real. Over-editing is as bad as under-editing.
Here’s what professional real estate photo enhancement services focus on that general editors miss:
Window Pull and View Preservation: Buyers pay for the view. If your windows are pure white, you’re hiding the best selling point. Advanced HDR image enhancement ensures interior and exterior exposure are both perfect.
Flambient Technique: The best editors use a method called Flambient — a mix of flash and ambient light shots blended together. It gives true-to-life colors with perfect brightness. It’s more time-consuming but the result is unmatched for luxury listings.
Grass Enhancement and Landscaping Pop: For exteriors, dead grass looks bad. A subtle green enhancement, not radioactive green, makes the yard look fresh without lying.
Twilight Magic: One of the most powerful edits is day to dusk photo editing service. A normal daytime exterior is converted into a beautiful twilight shot with warm lights glowing from inside. These twilight photos get 3x more clicks. Best twilight image enhancement service providers can turn any sunny photo into a stunning dusk image that looks like it was shot at the perfect golden hour.
Virtual Staging Ready Enhancement: Before you can virtually stage an empty room, the base photo must be perfectly enhanced — straight walls, bright, clean. Then virtual staging and image enhancement together help buyers visualize.
The Professional Workflow: How a Great Edit Actually Happens
If you send your photos to a pro studio, what really happens? It’s not one filter.
First comes culling and lens correction. Then white balance and color cast removal. Then they do HDR blending or Flambient blending. After that, they correct verticals and horizontals. Then dodge and burn — brightening dark corners, dimming overly bright spots. Then sky replacement if needed. Then cleanup — removing minor imperfections, reflections, and distractions. Finally, sharpening and exporting for MLS, Zillow, and print at the right resolution.
For drone photo enhancement for aerial property shots, there is an extra step of correcting haze and enhancing details from high altitude so the roof and surroundings look sharp.
For 360 degree real estate image enhancement, editors have to stitch and clean the nadir, balance light across the entire sphere, and ensure no stitching lines are visible.
This workflow takes 15-25 minutes per image for a skilled editor. For a 30-photo listing, that’s a full day’s work.
DIY Tools vs. Professional Real Estate Photo Editing Company
You can definitely learn basic enhancement. Lightroom, Photoshop, Luminar — all great tools. If you shoot one home a month for yourself, DIY is fine.
But if you are a realtor, photographer, or builder handling multiple listings a week, DIY will burn you out. Here’s the tradeoff:
DIY Pros: Full control, instant results if you know what you are doing.
DIY Cons: Steep learning curve, incredibly time-consuming, inconsistent results when you are tired, expensive software subscriptions, and you can’t easily master advanced techniques like virtual twilight photo editing or high-end HDR blending overnight.
Professional Service Pros: Consistency, speed, affordable compared to your hourly rate, access to advanced edits like day to dusk conversion, object removal, virtual staging, and aerial enhancement without hiring different people.
This is where outsourcing makes sense. And this is where you need a team that only does real estate.
There are many general photo editing companies. They will edit weddings, products, and real estate all in one. The problem is, real estate has its own language. An editor who doesn’t know what an MLS standard is, or why window pulls matter, will deliver pretty pictures that don’t sell.
That’s why specialist studios exist.
Why Photographers Are Switching to PixelShouters for Real Estate Edits
In the last couple of years, I’ve seen a lot of photographers talk about one name in real estate circles — PixelShouters.
PixelShouters is a real estate photo editing company built specifically for realtors and real estate photographers who need fast, consistent, and listing-ready results without the back-and-forth.
What I like about their approach is they don’t treat image enhancement as a one-size-fits-all filter. They understand the difference between an image that looks good on Instagram and an image that performs on the MLS.
If you need affordable HDR real estate photo editing that still keeps the image natural, they have a dedicated HDR blending workflow instead of that overcooked HDR look from 2015. If you need professional sky replacement for property photos, they match the lighting direction and color temperature so the sky doesn’t look pasted.
Their most requested edits tell you what actually sells right now: real estate image enhancement for Zillow listings with perfect brightness, day to dusk photo editing service for hero shots, drone image enhancement for aerial property shots to make large estates pop, and clean object removal for real estate images that saves a reshoot when you forget to hide the trash bin.
For busy photographers, the biggest pain point is turnaround and consistency. PixelShouters has cracked that by keeping a team that only edits real estate — so your 100th photo looks exactly like your first. No yellow tint creeping in at 2 AM edits. And they offer virtual staging ready enhancement, so you can send the same enhanced photo straight to staging without double work.
I’ve seen before-and-after samples where a dark, flat living room with blown-out windows was transformed into a bright, airy space with a visible backyard view — still realistic, just how it felt to be there. That’s the mark of good enhancement. It doesn’t scream “edited.” It whispers “welcome home.”
If you are shooting 3-4 properties a week and spending your nights editing, that’s not sustainable. Outsourcing to a dedicated partner like PixelShouters is how you scale without sacrificing quality.
Common Image Enhancement Mistakes That Make Your Photos Look Cheap
Even with good intentions, many beginners ruin photos in editing:
1. Over-Saturation: Making grass neon green and sky electric blue. Buyers instantly distrust it.
2. Over-Sharpening: Creates ugly white halos around edges.
3. Crooked Verticals: If you fix nothing else, fix this. Always.
4. Fake Blurs: Blurring backgrounds to hide clutter. It looks amateur in real estate.
5. Ignoring the Color Cast from Walls: If you have a strong red accent wall, its color reflects onto the white ceiling. Pros remove that color bleed.
6. Heavy Vignetting: Darkening corners to add drama works for portraits, not for homes. It makes rooms look smaller.
The golden rule: If someone can tell it’s heavily edited at first glance, you’ve gone too far. The best real estate image retouching for MLS listing is invisible.
The Future: AI and the Next Wave of Image Enhancement
AI is already changing everything. Tools now can auto-enhance brightness, replace skies in one click, and even remove furniture. But AI alone still fails at taste.
AI can make a room bright. It can’t always tell if that brightness looks natural. It can replace a sky, but often mismatches the light. It can remove a car, but leaves a weird smudge on the driveway.
The future is hybrid — AI for speed plus human editors for judgment. That’s what companies like PixelShouters are moving toward: using AI to handle the repetitive lens corrections and initial blending, then having a trained human eye do the final color, perspective, and realism check.
We will also see more demand for 360 degree real estate image enhancement as virtual tours become standard, and more video enhancement for short-form listing reels. The line between photo and video editing is blurring fast.
What won’t change is the principle: enhancement should serve the story of the home.
Final Takeaway
Image enhancement is not cheating. It’s completing the photo. Your camera captures data; enhancement creates emotion.
Whether you are a homeowner trying to get more offers, a realtor building your brand, or a photographer delivering to clients, learning what good enhancement looks like — or partnering with a team that lives and breathes it — is the fastest way to stand out.
Start with the fundamentals: correct color, balanced light, straight lines, clean skies. Master those, and 90% of your work is done. For the final 10% that makes a listing truly magnetic — the perfect twilight glow, the flawless window view, the drone shot that actually looks crisp — don’t hesitate to get specialist help.
If you want your listings to stop getting scrolled past and start getting saved, invest in the edit. Because in real estate, better images don’t just look better. They sell better.
And if you are looking for a team that gets real estate, not just Photoshop, PixelShouters is one of those rare editing companies that edits like a realtor thinks — with the sale in mind.